Sunday, March 16, 2014

Some Pig(s)! (It was written on the Web, get it?)

I still can't believe how quickly it happened. A couple came by my vendor table at a local art show (Big Bang Bazaar in Maitland, FL) and stopped to look at my work. I had all my Star Wars pigs and piggy banks out and after looking at a few of them, the couple asked me if I'd be able to make an Alice in Wonderland piggy bank. It was just the icing on the cake when I found out that I'd be making some piggies for Ashley Eckstein! If you don't know who Ashley is, then you need to look her up. Ashley was working on turning her dining room into the tea party from Disney's Alice in Wonderland and they wanted to give her something special that she could use in that awesome room. (It was all I could do not to fangirl-out right there. I also may have had a goofy grin on my face the rest of the weekend).

Here is the process I use to turn pigs into something special.

 I always start with pencil. It burns off in the kiln and gives you a guide to paint by. It also rubs off very easily and can be changed by wiping the design with your hand or an eraser. I find mechanical pencil works best because it stays the same thickness as it is used instead of getting duller and wider.

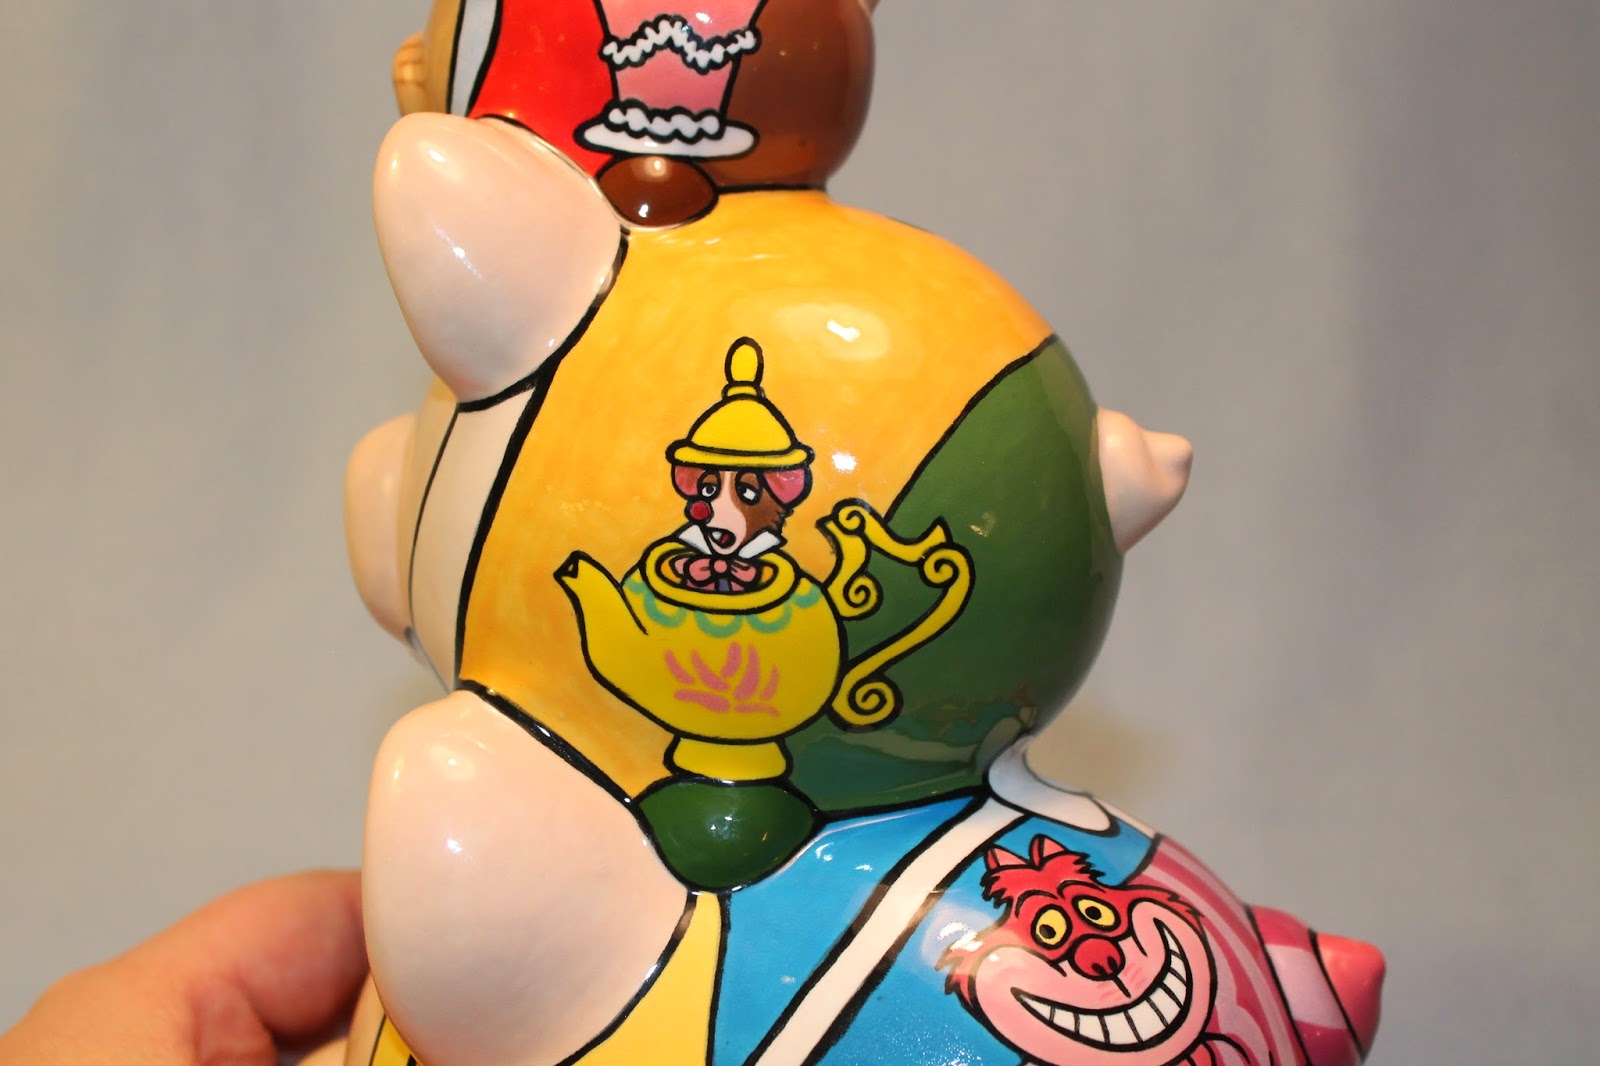
Since I was doing a Disney version of the characters, I wanted to include some Mad Tea Party elements in my design without making it too complicated. Of course I had to include the Cheshire Cat, and I knew exactly where he belonged! I used the tail on the biggest pig as his tail to give him a little bit of a 3-D look.


The three characters were the Ecksteins' idea and we decided to make Alice the largest pig, the Mad Hatter in the middle, and the March Hare on top. Plus, it helped add to the surprised look I gave Alice that they were on top of her!

It took between 20-40 hours to draw and paint the pig stack. I lost track somewhere in there. The glaze is a little paler than when it gets fired. It looks a little different than it will when it's out of the kiln.


 I wanted the design to be cute without being too complicated. I added the un-birthday cake, the dormouse in his teapot, and a stack of tea pots and cups on the other side.
One of the hardest things about glazing ceramics is actually choosing the colors. They don't look the same when fired and not all colors are available as glazes. I try to choose the closest colors or improvise a little by mixing a couple of colors if I need if I need a closer match.
 I also included a little surprise underneath!

And the finished product:


As a special bonus, the Ecksteins also wanted me to make a small Ahsoka Tano piggy, since Ashley is the voice of Ahsoka in Star Wars: The Clone Wars. I absolutely love her character and the series. She is one of the best female characters in any Sci Fi series. Ahsoka was just as much fun to paint, but took less than 10 hours to finish. Just like the Alice trio, I started her with pencil. Somehow I managed not to get a shot of her before I started painting. Here she is fully painted.
 Again, the colors are different when the glaze is dry, but not fired.
 Her costume was a little tricky to figure out, which I why I used this particular costume design instead of the midriff-baring one you often see in shots from the show.


 And another surprise message on the bottom. :)
 If you are a fan of the show, my little message will make a lot more sense.
And (drum roll please) the finished product:


 I hope you enjoyed this peek into my ceramic making process. These are the kind of pieces I love creating. If you're interested in your own custom piggy or something special, hit up my Etsy shop.

Friday, March 14, 2014

Muppets!

One of my friends, who I've known forever, has the coolest job and a recent video she did proved it. She got to hang out with the Muppets! Erin works at Buzzfeed and I'm supremely jealous of her getting to meet Miss Piggy and the other Muppets. (She's the redhead that gets to boss Miss Piggy around at the end). Give it a watch!
Oh, and she went to the Oscars and interviewed Kevin Spacey.
Check out her blog, A Side of Ginger.

Sunday, February 16, 2014

Howl's Random Plush

I'll admit, I've never seen Howl's Moving Castle. So, when someone messaged me to see if I could make a plush for them, I was a little curious. These are exactly the custom projects I love making. Someone is frustrated that their favorite show/movie/book/video game doesn't make a toy of their favorite character or item. I am more than willing to try my hand at making a special version for them. This one is for a significant other's surprise birthday present.

Now, if you have seen Howl's Moving Castle (or haven't), here is a screenshot of which plush she was talking about (courtesy of Google):
It's the pink and purple cow-looking thing on the bed.

It wasn't much to go by and that was the only shot I could really find. The hardest part is always coming up with the pattern. Once I've got that, it usually goes smoothly. I was a little disappointed when I couldn't find pink and purple striped fabric (you'd think someone would think it was a great idea given the Cheshire cat's fur is exactly the same), but I decided to simply make my own by using strips of purple and strips of pink sewn together.

Some progress shots:
And the finished product:

So what do you think? He's made with soft fleece and super cuddly!

Wednesday, January 29, 2014

Surprise Piggies!

Sorry for the long silence, but things have been a little crazy. I know you understand. I hope this makes up for it:
For those of you who are not nerdy enough to know, this is Ashley Eckstein on the left. She is the creator of Her Universe, which is a nerdy girl clothing line. She is also the voice of Ahsoka Tano from Star Wars Clone Wars CGI series. She has enough geek cred to do the Kessel Run in 12 parsecs, so I couldn't believe I got asked to make a couple of piggies as a surprise for her. She got them this week and shared pictures all over every social media site that she's on! I painted an Alice in Wonderland piggy bank stack with Alice, the Mad Hatter, and the March Hare on top of each other. The orange-faced pig is her character Ahsoka from Clone Wars. I promise I'll post some work in progress shots and pics of the finished project soon.

I've got some other projects in the works and once again, I'm planning on posting more often. I know, I know. We'll see...

Friday, November 1, 2013

So, I'm a terrible blogger...

Sorry, everyone that I haven't posted anything recently. Things have been a little crazy lately, including art shows, family stuff, and my day job. I promise I'll have more works in progress to post and maybe some fun stuff, too! Stick with me! :)

Sunday, June 30, 2013

Trial and Error

It's sometimes difficult to have a full-time job and work on custom projects, but I try to fit them in when I can. This includes writing entries for my blog. Don't hold me to it, but I'm going to aim at one post per week for the time being and we'll see where that leads.

Now, on to today's post:

I love to take on new projects, especially when they are custom. I made the cake toppers for my own wedding cake and since then I've really wanted to work on more. At the moment, I don't have a listing on my Etsy shop for cake toppers, but I'm always willing to make some. Lately, I have been doing wedding projects for my friends and family. Last year, I tried out something I'd been wanting to try for a long while: customizing blank vinyl toys.

I'd done quite a bit of research on customizing blanks, but reading and doing are two different things. I had to adjust a little of what I was doing as I went and ended up being very happy with the result, but now I know what to do a little better for next time.

I started out with a couple of Mini Munny figures from Kidrobot:


And then found out that they didn't care for Bub. Poor Bub.
 
After washing the Munny pieces in soap and water (which was recommended on several tutorials), I started adding Super Sculpey to the pieces that needed it. I made a wedding dress (I used tin foil underneath the dress to reduce the weight and amount of Sculpey) and then started working on the hair. The tiara was a separate piece and I added the bun one piece at a time.
 I wanted to make the faces flat, so I added Sculpey to the crease on the lower half of the vinyl head. I also added snowflake details to the dress and tiara.
 The groom was a little simpler. He needed some hair, his tie and lapels, and then some cuffs on this arms.
 The Sculpey gets a little lighter and less shiny after it is baked in the oven. I used the directions according to the box and kept a close eye on it since the vinyl was also getting baked and I didn't want to burn or melt it.
I didn't get any shots of the painting in progress, but I used regular acrylic paints (and I wish I had used the spray primer like it was recommended in the tutorials because it would have taken fewer coats of paint in the end). I used a clear gloss spray to seal each piece after the paint was dry. I used Krylon Clear Gloss and I definitely recommend it. It sprays and covers well and dried relatively quickly. 

Here is the end result:


I wanted them to be a simple design for the face, but slightly cartoony and cute. They were very fun to make, and were a hit at the wedding, but the groom decided to take a flying leap from the top of the cake. If you look closely, you can see a dent in the right corner of the cake layers. Next time I think I may need to make a stand for them.

And they lived happily, ever after...

Saturday, June 22, 2013

The making of a mascot

Since I've been on Etsy for a while, occasionally I will get messages asking if I can make a custom item. I love making one-of-a-kind pieces and these requests help me make things that I wouldn't usually think of doing. I'm not always able to create these requests, for one reason or another, but I try to fit them in when I can.

A few months ago, I got a message from someone over at Get Set Games to make a plush version of the main character from one of their most popular game apps. The little guy is named Redford, and he's in Mega Jump, if you've ever heard of that. Here he is for reference:

He's such a cute little guy. He took me a little while to figure out what size and shape everything needed to be, then I started cutting out his little pieces. 

 A little bit of sewing and I had a couple legs, arms, and ears.
 The body was simple and quick, but his teeth and toes were a little time consuming.
 Stuffing is always a fun part of any project because they fill out a little and start to take shape.
 Pretty soon, he was able to stand up, but was missing quite a few parts.
 The tail was also a fun little part to do.
 His teeth and toes were all sewn on individually and stuffed a little bit to give them some body.
 The last parts were his eyes, which gave me a little trouble on the size and shape, but I finally got them so that I was happy.
 And here is the finished product:

My favorite part was I made him so that you can put things into his mouth, so before I shipped him to Get Set Games, I stuffed his mouth full of business cards. (I know, but I've got to promote my wares)
 What do you think? He's a pretty cute little monster, in my opinion.